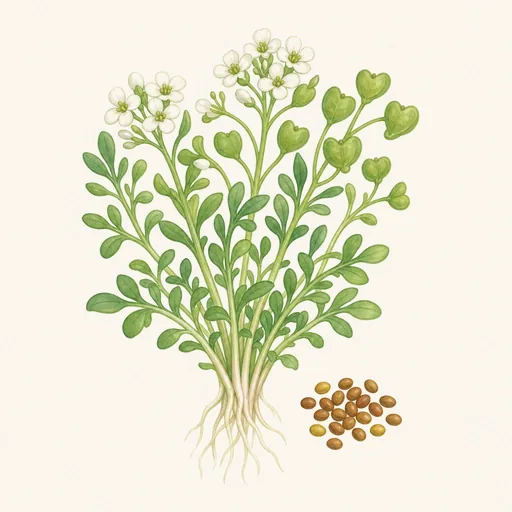
Garden Cress
Lepidium sativum · Brassicaceae
- Sow outdoorsFrom 4 weeks before the last frost until the last frostMar 13 – Apr 16
- Plant in autumn4–8 weeks before the first autumn frostAug 30 – Oct 3
- Space5–10 cm (2–4 in) apart
- Harvest14–30 days after plantingMar 27 – Jun 6
Description
Garden cress is a fast-growing, edible annual in the mustard family (Brassicaceae), grown chiefly for its tender shoots and leaves. It forms a small upright plant with slender, branching stems and bright green foliage. Seedlings have rounded seed leaves; as the plant matures, its true leaves become more deeply divided. If allowed to flower, it produces clusters of tiny white to pale pink flowers, followed by small seed pods. Both the leaves and seeds have a peppery, slightly pungent flavor reminiscent of watercress or mustard, although garden cress is a different plant from watercress.
It is often raised as a salad green or as a quick sprout crop. Seeds germinate readily in moist soil or on a damp growing mat, and young shoots can usually be harvested within one to two weeks. Plants grown for larger leaves take longer and are best picked before flowering, while their texture is still tender. Garden cress prefers cool conditions, consistent moisture, and a fertile, well-drained growing medium. It tolerates partial shade, especially in warm weather, but prolonged heat encourages flowering and can make the leaves tougher and more bitter. Sow small batches every week or two for a steady harvest. Indoors, give seedlings bright light and good airflow; avoid letting dense trays stay waterlogged.
Fresh leaves enliven sandwiches, salads, soups, and egg dishes; add them just before serving to retain their crispness and bite. In parts of South Asia and the Middle East, the reddish-brown seeds are eaten in foods and drinks, often after soaking, when they swell and develop a slippery coating. Its short growing cycle makes garden cress suitable for windowsills, containers, and small gardens. Use clean water and hygienic handling for sprouts intended to be eaten raw.
Growing Conditions
30–60 cm (12–24 in) tall, 10–20 cm (4–8 in) wide
- Smallest
- Largest
Full sun, 4+ hours
Tolerates part sun, part shade
Moderate
Keep evenly moist, not soggy.
Ideal 10–20 °C (50–68 °F)
Survives down to −3 °C (27 °F).
pH 6–7.5 · neutral
Where it Grows
Planting
When to Plant
Plant garden cress in cool weather. Outdoors, sow it as soon as the soil can be worked in spring, then make small repeat sowings every one to two weeks while temperatures remain mild. It grows quickly, so these successive plantings provide a steadier supply than one large sowing. For an autumn crop, start sowing again in late summer as the hottest weather passes; in mild climates, you can continue into fall or grow it under protection during winter. Garden cress tolerates light frost, but prolonged heat makes it bolt and turns the leaves sharper and tougher. Choose a spot that will stay reasonably cool, or provide afternoon shade as temperatures rise. You can also sow it indoors in a bright window or under grow lights at any time of year, particularly if you want sprouts or microgreens. Expect outdoor harvests of young leaves roughly three to four weeks after sowing.
How to Plant
Direct-sow garden cress where you want it to grow; its short growing period makes transplanting unnecessary. Choose loose, well-drained soil enriched with a little compost. Full sun works well in cool weather, while light afternoon shade helps in warmer conditions. Moisten the soil before sowing. Scatter the seeds thinly or sow them in rows about 6 to 12 inches (15 to 30 cm) apart, then cover with roughly 1/8 to 1/4 inch (3 to 6 mm) of fine soil. Water gently so the seeds do not wash away, and keep the surface consistently moist until they sprout, usually within several days. For larger leaves, thin seedlings to about 2 to 4 inches (5 to 10 cm) apart. For baby leaves, sow more densely and cut the greens while young.
For indoor microgreens, spread seeds evenly over a shallow tray of moist seed-starting mix. Press them into the surface, cover lightly with mix, and keep the tray in bright light once seedlings emerge. Water gently and avoid leaving the tray waterlogged. Cut microgreens with clean scissors, usually about one to two weeks after sowing. Use clean containers and seeds intended for edible growing.
Growth Timeline
- Germination 2–7 days
- Growing 14–30 days
- Harvest 1–2 weeks
Planting Calendar
- Sow outdoors: from 4 weeks before the last frost until the last frost
- Autumn planting: 4–8 weeks before the first autumn frost
- Germination: 2–7 days
- Sow outdoors: Mar 13 – Apr 16
- Autumn planting: Aug 30 – Oct 3
- Harvest: Mar 27 – Jun 6
Care
Care Calendar
- Thin · Mar 13 – Jun 11
Thin crowded seedlings to about 2 inches apart if growing for full-sized leaves. - Protect · May 8 – Jul 9
Give afternoon shade during warm weather to slow bolting.
Watering
Keep the top layer of soil consistently moist from sowing until harvest. Garden cress germinates quickly, but its shallow roots make seedlings vulnerable to drying out. Water freshly sown seeds with a fine spray or a watering can fitted with a rose so they are not washed away. Check containers daily, especially on sunny windowsills, where small amounts of soil dry rapidly. Once seedlings are growing, water when the surface begins to dry rather than following a fixed schedule. Water the soil gently, or set a container with drainage holes in a shallow tray of water briefly and then let it drain. Avoid leaving roots in standing water: saturated soil encourages seedling rot and damping-off disease. Outdoor beds may need more frequent attention during warm or windy weather. Aim for even moisture, not soggy soil; irregular watering can leave the tender leaves wilted or coarse.
Weeding
Remove weeds early, while both the weeds and cress are small. Garden cress grows fast, so a short crop may need little weeding, but competing plants can still take moisture and light from its shallow roots. Start with clean potting mix or a weed-free outdoor bed, and remove visible perennial roots before sowing. In a garden bed, pull weeds by hand when the soil is slightly damp, holding the ground near the cress seedlings to avoid disturbing them. Work carefully: hoeing close to a dense row can uproot the crop. If seedlings are crowded, thin the cress separately rather than treating it as a weed; the removed seedlings can be eaten if they are clean and healthy. Check containers for stray weed seedlings as well. Avoid herbicides around a crop harvested for its tender leaves, particularly one that may be ready to eat within weeks.
Mulching
Mulch is usually unnecessary for garden cress grown as sprouts, microgreens, or a short-term container crop. In an outdoor bed, a very thin layer of fine, clean straw or other loose organic material between rows can help reduce evaporation and suppress weeds. Wait until the cress has emerged, and keep mulch off its leaves and stems. Do not cover newly sown seed with coarse mulch: it may block the small seedlings or make it difficult to keep the seedbed evenly moist. Thick, wet mulch around closely spaced plants can also trap moisture and encourage rot. If the crop will be harvested in only a few weeks, regular watering and prompt hand-weeding are often simpler than mulching. For repeated outdoor sowings in hot weather, mulch the spaces between rows rather than the crop itself, and check beneath it occasionally for slugs.
Fertilizing
Garden cress usually needs little fertilizer because it is harvested so quickly. For outdoor growing, prepare the bed with a modest amount of finished compost before sowing; loose, reasonably fertile soil is enough for most crops. For containers, use fresh, good-quality potting mix. Microgreens harvested soon after germination generally need no feeding, since the seeds and growing medium support their brief growth. Avoid heavy applications of manure or high-nitrogen fertilizer, which can produce overly soft growth without improving a short harvest. Do not put fresh manure on a crop whose leaves will be eaten raw. If growing cress on for several weeks in a poor container mix, a dilute balanced liquid fertilizer may help, but apply it according to the label and only when needed. Water the mix before feeding, and keep fertilizer off the leaves where practical. Consistent moisture matters more than frequent feeding.
Pest Management
Inspect garden cress often; its short growing period means early action is more useful than treating serious damage later. Outdoors, flea beetles may leave tiny holes in leaves. A fine insect-exclusion cover placed over the bed immediately after sowing can help, provided its edges are secured. Slugs and snails may eat young seedlings, so clear hiding places near outdoor rows and remove pests by hand when found. Aphids can sometimes gather on leaves; remove badly infested plants or rinse lightly affected plants before harvest. Indoors, the main concern is often damping off rather than insects. Use clean containers and growing mix, avoid overcrowding, provide airflow, and water without leaving the mix saturated. Discard collapsed or moldy seedlings rather than eating them. Because cress is often consumed raw and harvested within days or weeks, avoid routine pesticide sprays; use only products explicitly labeled for the crop and observe their harvest intervals.
Harvesting
Harvest garden cress according to how you plan to use it. For microgreens, cut clean, healthy shoots with scissors just above the growing medium when the seed leaves are fully open, often about 7–14 days after sowing. For larger, peppery leaves, allow the plants to grow for roughly 3–4 weeks, then snip young stems and leaves before they become tough or start flowering. Timing varies with temperature and light, so judge by size and tenderness as well as the calendar. Use clean scissors and avoid pulling soil or growing medium into the harvest. Cress cut very close to the base may not regrow reliably; sow small batches every week or two for a steadier supply. Harvest just before use for the best texture and flavor. Rinse leaves if needed, dry them gently, and refrigerate them briefly in a covered container; they wilt quickly after cutting.
Growing in Containers
Grows well in a pot of at least 1 litres (0.3 US gallons), with drainage holes. Can be grown indoors as a houseplant.
Propagation
From seed
- Sow seeds thinly in moist soil or seed-starting mix.
- Cover lightly with about 3 mm (⅛ inch) of mix.
- Keep the surface consistently moist.
- Harvest young leaves and sow again for a continuous supply.
Companion Plants
Good neighbors
- Radishes: Garden cress is traditionally interplanted with radishes because both grow quickly and can be harvested together.
Common Problems
- Yellowing leaves
- Sticky residue on leaves
- Black sooty coating
- Curled or cupped leaves
Aphids are small, soft-bodied insects that feed by piercing plants and drawing out sap. The group includes many…
- Holes in leaves
- Stunted growth
- Wilting
Flea beetles are a group of small leaf beetles named for their ability to jump when disturbed. Most adults are about…
- Seedlings collapse at soil level
- Soft or rotting stems
- Brown, mushy roots
- Wilting
Damping off is a disease of seeds and young seedlings, not a single organism with one scientific name. It can be…
- Flowering too early (bolting)
Bolting is the premature switch from leafy or root growth to producing a flower stalk and seeds. It is a normal part…
- Damping off: Seedlings collapse in persistently wet, poorly ventilated growing conditions.
- Bolting: Heat, long days, or water stress prompt flowering and make the leaves less tender.
- Aphids and flea beetles: Aphids cluster on new growth; flea beetles leave small holes in leaves.
- Leggy or yellow seedlings: Usually caused by insufficient light or overcrowding.
Varieties
Its finely divided leaves add texture to salads and sandwiches.
- frilly leaves
- early
Its larger, flatter leaves are convenient to cut for salads.
- broad leaves
- easy to harvest
More about varieties
- Curled cress: A common type with finely divided, frilly leaves and a peppery flavor.
- Broadleaf cress: Has larger, flatter leaves that are easier to pick individually.
Health Benefits
Garden cress is commonly eaten as a fresh herb, garnish, or young seedling. Its peppery leaves add flavor to sandwiches and salads without much salt. They provide vitamin K, which is needed for normal blood clotting, as well as vitamin C and carotenoids. As with other leafy greens, the amount of any nutrient you get depends on how much you eat; a small garnish is not a substantial serving of vegetables.
Garden cress seeds have a history of use in traditional foods and remedies, including drinks and preparations taken after childbirth. They contain fiber and form a gel when soaked in water. However, evidence for specific medicinal benefits of the seeds is limited, and garden cress should not be used in place of treatment for a health condition.
If you take warfarin, keep your intake of vitamin-K-rich greens consistent and ask your clinician before making major dietary changes. Wash cress well before eating it. Home-grown sprouts can carry harmful bacteria even when they look clean; people at higher risk from foodborne illness, including pregnant people and those with weakened immune systems, should avoid eating raw sprouts.
Fun Facts
- Garden cress belongs to the mustard family, along with cabbage and radishes.
- Its seedlings can often be cut for eating within one to two weeks of sowing.
- The seeds develop a slippery gel-like coating when soaked in water.
- Children often grow cress on damp cotton or paper towels to watch its rapid germination.
Notice an error or have a question about Garden Cress? Contact us