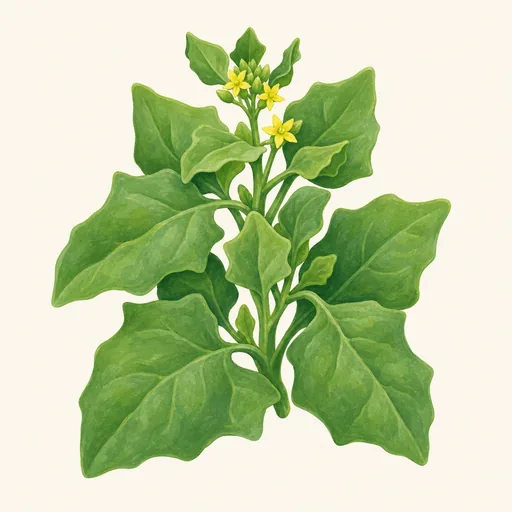
New Zealand Spinach
Tetragonia tetragonioides · Aizoaceae
- Start indoors2–4 weeks before the last frostMar 13 – Apr 2
- Sow outdoors1–3 weeks after the last frostApr 17 – May 7
- Plant out1–3 weeks after the last frostApr 17 – May 7
- Space45–60 cm (18–24 in) apart
- Harvest50–70 days after plantingJun 6 – Aug 6
Description
New Zealand spinach is a sprawling, warm-season leafy vegetable in the ice plant family (Aizoaceae). Despite its name, it is not closely related to true spinach. Its thick, triangular to diamond-shaped leaves are bright green and slightly succulent, growing on branching stems that spread across the ground. Small, inconspicuous yellow flowers develop into hard, often horned fruits containing the seeds. The leaves and tender stem tips have a mild flavor and can be eaten raw when young or cooked like spinach.
Unlike true spinach, New Zealand spinach continues producing leaves through summer heat and is slow to become bitter or stop growing in long days. It is frost-sensitive and grows best in full sun and well-drained soil. Sow it outdoors after the last frost, once the soil has warmed, or start it indoors for an earlier crop. Soaking the hard fruits overnight before sowing can improve germination. Give plants room to spread, roughly 45–60 cm apart, or let their stems trail over the edge of a raised bed. Regular watering encourages tender growth, although established plants tolerate some dryness and coastal conditions.
Harvest young leaves and shoot tips repeatedly, leaving enough foliage for the plant to regrow. Pinching stems also encourages branching. The plant may self-sow where winters are mild, but in colder climates it is usually grown as an annual. Like ordinary spinach, its leaves contain oxalates; people who need to limit oxalates should take this into account. Cooking the leaves in water and discarding the cooking liquid reduces their oxalate content. Native to parts of the Asia-Pacific region, including New Zealand and Australia, it is also cultivated as a summer green in temperate and subtropical gardens elsewhere. Its spreading habit can make it a useful edible ground cover, though stems may overrun nearby small plants.
Growing Conditions
30–60 cm (12–24 in) tall, 0.6–1.2 m (2–4 ft) wide
- Smallest
- Largest
Full sun, 6+ hours
Tolerates part sun
Moderate
Keep evenly moist, not soggy.
Ideal 18–30 °C (64–86 °F)
Survives down to 0 °C (32 °F).
pH 6–7.5 · neutral
Where it Grows
Planting
When to Plant
Plant New Zealand spinach when the weather and soil have warmed, not on the schedule for ordinary spinach. It is a warm-season plant that grows best through summer and is damaged by frost. Sow outdoors after your last expected spring frost, once the soil is at least 65°F (18°C) and nights are reliably mild. In cool-spring areas, waiting another week or two after the last frost often gives better germination than sowing into cold ground. Use a soil thermometer if you are unsure; the air temperature on a sunny afternoon can be misleading.
For an earlier harvest, start seeds indoors about three to four weeks before the last frost, then move the seedlings outside only after frost danger has passed. If you garden where winters are frost-free, plant during a reliably warm part of the year. Allow for roughly two months of warm growing weather before expecting a substantial harvest. Unlike ordinary spinach, New Zealand spinach tolerates summer heat and is not normally planted as a cool-season crop.
How to Plant
Choose a spot with full sun, or some afternoon shade in very hot climates. New Zealand spinach makes spreading, trailing plants, so give it room: space plants about 18–24 inches (45–60 cm) apart. Work compost into well-drained soil before planting. The soil should hold some moisture without remaining waterlogged.
For direct sowing, plant the hard seed clusters about ½ inch (1 cm) deep. Put two or three clusters at each planting spot, water gently, and keep the soil evenly moist until seedlings appear. Germination can be slow and uneven, often taking two to four weeks. Soaking the clusters in water overnight before sowing may help them sprout more readily. A cluster can produce more than one seedling; once the plants have a few true leaves, thin each spot to its strongest plant.
If starting indoors, use individual pots to reduce root disturbance. Set transplants outside gradually over about a week so they adjust to sun and wind, then plant them at the same depth they grew in their pots. Water after planting and continue watering during dry spells. A light mulch, kept away from the stems, helps retain moisture and suppress weeds.
Growth Timeline
- Germination 10–21 days
- Seedlings indoors 0–5 weeks
- Growing in the garden 50–70 days
- Harvest 8–16 weeks
Planting Calendar
- Start seeds indoors: 2–4 weeks before the last frost
- Sow outdoors: 1–3 weeks after the last frost
- Plant outdoors: 1–3 weeks after the last frost
- Germination: 10–21 days
- Start indoors: Mar 13 – Apr 2
- Sow outdoors: Apr 17 – May 7
- Plant out: Apr 17 – May 7
- Harvest: Jun 6 – Aug 6
Care
Care Calendar
- Thin · Apr 24 – May 21
Thin seedlings to about 12 inches apart once they have several true leaves. - Mulch · May 1 – May 28
Apply mulch after the soil warms to retain moisture and keep leaves clean. - Pinch out · May 22 – Aug 6
Regularly pinch or cut tender shoot tips to encourage branching and new growth.
Watering
Keep the soil consistently moist while New Zealand spinach seeds germinate and seedlings establish. Water gently so you do not wash seeds out of place. Once plants are growing strongly, they tolerate short dry spells, but regular watering produces more tender leaves and shoot tips. Check the soil rather than following a fixed schedule: water when the top few centimetres feel dry, soaking the root zone instead of sprinkling the surface. Containers dry out faster than garden beds and may need checking daily in hot weather. Water at the base of the plant when possible, preferably in the morning, so foliage has time to dry. Good drainage matters; do not leave roots in soggy soil. If growth slows or leaves become tough during a hot, dry spell, resume steady watering rather than giving occasional, very large drinks.
Pruning
New Zealand spinach needs little formal pruning. Pinch out the growing tips of young plants once they are well established if you want to encourage branching and a bushier supply of edible shoots. After that, regular harvesting serves much the same purpose: cut tender stem tips just above a leaf joint, leaving enough foliage for the plant to regrow. If long stems spread into paths or smother nearby crops, trim them back as needed. Avoid cutting the whole plant to the ground, especially during hot or dry weather, as this can slow recovery. Remove damaged or decaying stems to keep the patch tidy. Toward the end of the season, you can remove flowering stems or developing seed capsules if you do not want self-sown plants; dispose of mature seed-bearing material rather than leaving it in the bed.
Weeding
Weed around New Zealand spinach regularly while plants are small. Young plants grow slowly at first and can be crowded by fast-growing weeds competing for light, water, and nutrients. Pull weeds by hand when the soil is slightly damp, or use a hoe carefully between plants. Work shallowly near the stems so you do not disturb the spinach’s roots or pull up seedlings. Once established, its trailing stems spread across the soil and shade out many new weeds, so the job usually becomes easier. Check beneath the foliage occasionally: persistent grasses and other weeds can still grow through the canopy and are harder to remove once tangled with the stems. Keep the edges of the bed clear to prevent weeds from seeding into it. Identify volunteer New Zealand spinach seedlings before weeding, particularly if you allowed plants to set seed the previous year.
Mulching
Apply mulch after the soil has warmed and young New Zealand spinach plants are established. A layer of straw, shredded leaves, or other clean organic material roughly 5–8 cm deep helps retain moisture, reduces weed germination, and keeps sprawling stems and leaves off bare soil. Leave a small gap around each plant’s crown rather than piling mulch against its stems. Water the bed before mulching if the soil is dry; mulch helps conserve moisture already in the ground but does not replace watering. In cool or persistently wet conditions, use a thinner layer and check beneath it for slugs and snails, which may shelter there and feed on young plants. Top up mulch as it breaks down or is displaced by harvesting. At the end of the season, compost clean organic mulch or work well-rotted remnants into the soil for the next crop.
Fertilizing
New Zealand spinach grows well in reasonably fertile, well-drained soil. Before planting, mix in finished compost or another well-rotted organic amendment; this is often enough to support a home-garden crop. In containers, use a quality potting mix and follow its feeding recommendations, since nutrients can wash out with frequent watering. Once harvesting is underway, watch the plant rather than fertilizing on a rigid schedule. If growth becomes weak and leaves look pale despite adequate water and warmth, apply a light dose of a balanced fertilizer according to the label, or add a little compost around the plants. Water after applying dry fertilizer and keep it off the foliage. Avoid heavy applications of nitrogen: lush, soft growth is not necessary for a productive crop, and too much fertilizer can waste money or damage roots. Do not fertilize dormant or frost-damaged plants in an attempt to restart growth.
Pest Management
New Zealand spinach is generally a low-maintenance crop, but inspect young plants and the undersides of leaves regularly. Slugs and snails may eat seedlings or tender leaves, particularly in damp beds; hand-pick them, reduce hiding places near the plants, or use a bait labeled for edible crops if needed. Aphids or other leaf-feeding insects may occasionally appear. A firm spray of water can dislodge small aphid colonies, and removing badly affected leaves may be enough when damage is limited. Avoid spraying broad-spectrum insecticides routinely, as they can also harm beneficial insects. Provide adequate spacing and water at soil level to help foliage dry and discourage disease. If you use any pesticide, confirm that its label permits use on edible leafy crops and follow the stated harvest interval. Discard leaves that are badly damaged, decaying, or contaminated by pests, and wash harvested leaves before use.
Harvesting
Begin harvesting when New Zealand spinach has several well-established, branching stems, rather than stripping a young seedling. Snip off tender shoot tips and young leaves with clean scissors, or pinch them off by hand. Taking roughly the last 10–15 cm of a growing stem encourages side shoots and gives you a continuing supply through warm weather. Pick regularly: older leaves and stems become tougher, while repeated light harvests keep new growth coming. Leave plenty of foliage on each plant so it can recover, and reduce harvesting if heat or drought has slowed growth. Harvest in the morning if possible, then wash the leaves thoroughly and refrigerate them promptly; they are best used fresh. Like true spinach, New Zealand spinach contains oxalates. Cooking the leaves and discarding the cooking water can reduce their oxalate content, which may matter for people advised to limit oxalates.
Growing in Containers
Grows well in a pot of at least 20 litres (5.3 US gallons), with drainage holes. Best kept outdoors.
Propagation
From seed
- Soak the hard, woody seed pods in water overnight.
- Sow outdoors after the last frost, once the soil is warm.
- Cover with about 1 cm of soil and keep evenly moist.
- Thin seedlings to about 30–45 cm apart.
From cuttings
- Cut a healthy stem about 10–15 cm long.
- Remove leaves from its lower half.
- Insert the bare stem into moist potting mix.
- Keep warm and moist until it roots, then transplant.
Companion Plants
Good neighbors
- Tomatoes: New Zealand spinach can grow beneath taller tomato plants as a living mulch, helping shade the soil in warm weather.
Common Problems
- Yellowing leaves
- Sticky residue on leaves
- Black sooty coating
- Curled or cupped leaves
Aphids are small, soft-bodied insects that feed by piercing plants and drawing out sap. The group includes many…
- Holes in leaves
- Slime trails
- Stems chewed or cut through
Slugs and snails are soft-bodied mollusks that feed on many garden plants. Snails carry a visible shell; most slugs…
- Brown or crispy leaf edges
- Wilting
- Bleached or scorched patches
- Leaves dropping
Frost damage is an injury caused when plant tissues become cold enough for ice to form or for cells to lose water to…
- Slow or uneven germination, especially in cool soil; soaking the hard seed capsules before sowing can help.
- Frost damage and slow growth in cool weather.
- Slugs, snails, and aphids feeding on tender growth.
- Yellowing or rotting roots in poorly drained, waterlogged soil.
- Occasional leaf spots, particularly when foliage stays wet.
Health Benefits
New Zealand spinach is used much like ordinary spinach: its tender leaves and shoot tips can be added to salads or cooked as a leafy green. It provides fiber and nutrients including vitamin C, vitamin A precursors, vitamin K, and folate. As part of a varied diet, leafy greens can help people meet their nutrient needs, while their fiber supports normal digestion. New Zealand spinach is a food, however, not a treatment for a medical condition.
The leaves also contain oxalates. These compounds can reduce absorption of some minerals and may be a concern for people advised to limit oxalates, such as some people with a history of calcium oxalate kidney stones. Cooking the leaves and discarding the cooking water can lower their oxalate content, though it can also reduce water-soluble vitamins such as vitamin C. People taking warfarin should keep their intake of vitamin K-rich greens reasonably consistent and follow their clinician’s advice rather than suddenly eating much larger amounts. For most people, New Zealand spinach is best enjoyed as one of several vegetables in a balanced diet, not relied on as a sole source of nutrients.
Fun Facts
- Despite its name, New Zealand spinach is not closely related to ordinary spinach.
- Its thick, triangular leaves tolerate summer heat better than ordinary spinach.
- It grows naturally in coastal areas of New Zealand and Australia.
- Each hard, horned seed capsule can contain several seeds.
- Explorer James Cook’s crew gathered it in New Zealand as a fresh green during their voyage.
Notice an error or have a question about New Zealand Spinach? Contact us