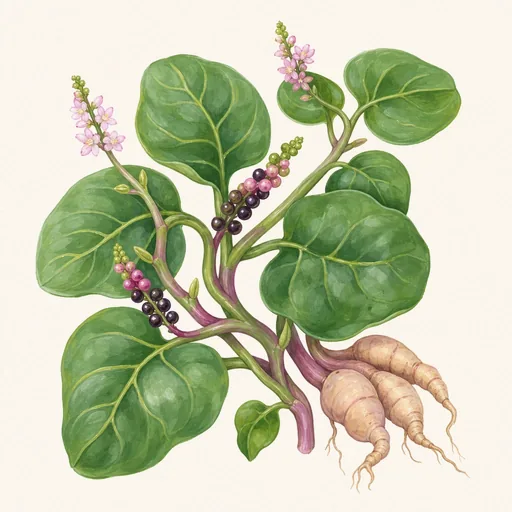
Malabar Spinach
Basella alba · Basellaceae
- Start indoors4–6 weeks before the last frostFeb 27 – Mar 19
- Sow outdoors2–4 weeks after the last frostApr 24 – May 14
- Plant out2–4 weeks after the last frostApr 24 – May 14
- Space30–45 cm (12–18 in) apart
- Harvest50–70 days after plantingJun 13 – Aug 13
Description
Malabar spinach is a fast-growing, twining vine grown for its edible leaves and tender stems. Despite its name, it is not related to true spinach. Its thick, glossy, heart-shaped leaves have a mild flavor and a slightly slippery texture when cooked. Plants may have green or reddish stems; both forms are commonly grown as vegetables.
In warm climates, Malabar spinach is a perennial, but gardeners in cooler regions usually grow it as a summer annual. It thrives in heat that causes true spinach to bolt. Give it a trellis, fence, or other support: its winding stems can reach several meters long. It grows best in fertile, well-drained soil kept consistently moist, with full sun or partial shade. Regular watering helps keep the leaves tender, and picking the growing tips encourages branching and fresh growth. Frost damages the plant, so sow seeds or set out plants only after the weather has warmed.
Harvest individual leaves or cut young shoots throughout the growing season. The leaves can be eaten raw in salads, though their substantial texture is especially suited to stir-fries, soups, and stews. Cooking releases mucilage that can lightly thicken a dish. The tender stems are edible too; older stems may become fibrous. As with other leafy vegetables, wash harvested produce before eating it.
Small white to pink flowers develop along the stems, followed by dark purple berries whose juice can stain hands and clothing. The plant can be started from seed or stem cuttings. If berries are left to mature, it may self-seed where winters are mild. Frequent harvesting is often more useful than letting the vine flower heavily, because the youngest leaves and shoots are the most tender.
Growing Conditions
1.8–3 m (6–10 ft) tall, 60–90 cm (2–3 ft) wide
- Smallest
- Largest
Full sun, 4+ hours
Tolerates part sun, part shade
Moderate
Keep evenly moist, not soggy.
Ideal 24–35 °C (75–95 °F)
Survives down to 0 °C (32 °F).
pH 6–7 · acidic to neutral
Where it Grows
Planting
When to Plant
Plant Malabar spinach when the weather has settled into summer warmth. It is a tropical vine, not a cool-season spinach, and frost can kill it. Sow seeds outdoors after the last spring frost, once the soil has warmed to at least 70°F (21°C) and nighttime temperatures are reliably above about 50°F (10°C). In cool-summer regions, wait for a genuinely warm spell; seeds may germinate slowly or rot in cold, wet soil. For an earlier harvest, start seeds indoors about six to eight weeks before the last expected frost. Move seedlings outside only after frost danger has passed, first acclimating them to outdoor sun and wind over several days. Transplants will grow fastest when days are consistently warm. In frost-free climates, plant during the warm growing season rather than during cool weather. You can make additional sowings during a long summer, allowing enough time for the vines to produce leaves before temperatures fall.
How to Plant
Choose a spot with fertile, well-drained soil and full sun to partial shade. Malabar spinach climbs vigorously, so put a sturdy trellis, fence, or other support in place before planting; vines can grow several feet long. Work compost into the bed to help the soil hold moisture without becoming waterlogged.
Sow seeds about ½ inch (1 cm) deep. Their hard seed coats can slow germination; soaking them in water overnight before sowing is optional but may help. Keep the soil evenly moist and warm while they germinate. Space seeds a few inches apart, then thin seedlings to about 12 inches (30 cm) apart so each vine has room to grow. If using indoor-grown plants, set them at the same depth they grew in their containers and handle the roots gently. Water thoroughly after planting.
Keep young plants watered while they establish, and guide new growth onto the support. A layer of mulch helps conserve moisture once the soil is warm. If you have an established plant, you can also start new vines from stem cuttings rooted in water or moist potting mix; plant them out only when conditions are warm.
Growth Timeline
- Germination 10–21 days
- Seedlings indoors 3–8 weeks
- Growing in the garden 50–70 days
- Harvest 10–16 weeks
Planting Calendar
- Start seeds indoors: 4–6 weeks before the last frost
- Sow outdoors: 2–4 weeks after the last frost
- Plant outdoors: 2–4 weeks after the last frost
- Germination: 10–21 days
- Start indoors: Feb 27 – Mar 19
- Sow outdoors: Apr 24 – May 14
- Plant out: Apr 24 – May 14
- Harvest: Jun 13 – Aug 13
Care
Care Calendar
- Stake · Apr 24 – May 14
Provide a trellis when planting out into warm soil. - Mulch · Apr 24 – May 21
Mulch around plants to keep the soil evenly moist. - Pinch out · May 15 – Aug 6
Pinch vine tips regularly to encourage branching and tender new leaves.
Watering
Keep the soil consistently moist while Malabar spinach establishes and during hot weather. Water deeply at the base of the plant whenever the top 2–3 cm (about 1 inch) of soil feels dry, rather than giving frequent light sprinkles. Established plants tolerate brief dry spells, but uneven moisture can slow growth and make leaves smaller or tougher. Containers dry out faster than garden beds and may need checking daily in summer. Water in the morning when possible, and aim to wet the soil rather than the foliage. Use a pot with drainage holes, or plant in well-drained soil: roots should not sit in waterlogged ground. A layer of mulch helps retain moisture, but still check the soil beneath it before watering. Adjust your schedule for rainfall, heat, wind, and soil type instead of following a fixed timetable.
Pruning
Pinch out the growing tips of young vines once they are established to encourage branching and produce more tender shoots. Make each pinch just above a leaf node, where new side growth can develop. As the vine grows, guide its stems onto a trellis, fence, or other sturdy support. Trim stems that stray into paths or crowd neighboring plants; the tender trimmings can be eaten if they are healthy. Harvesting shoot tips regularly often provides all the pruning a productive plant needs. Remove yellow, damaged, or diseased leaves promptly, and clean shears between plants if disease is suspected. If you want a long season of leafy growth, remove developing flower spikes when practical, as flowering can shift some of the plant’s energy toward seed production. Avoid stripping most of the foliage at once; leave enough leaves for vigorous regrowth.
Weeding
Keep the area around young Malabar spinach plants free of weeds until the vines are well established. Weeds compete for water, nutrients, and light, and they can make it harder to spot pests near the base of the plant. Pull weeds by hand or use a shallow hoe when the soil is slightly moist, taking care not to disturb the spinach’s roots or damage its stems. Remove weeds while they are small, before they flower and set seed. Pay particular attention to weeds growing against a trellis, where they can become tangled with the vine. Once the plant has filled its space, its foliage may shade out some seedlings, but continue checking for persistent weeds. Mulch can reduce new weed growth. If a weed is wrapped around a stem, cut it away rather than pulling hard enough to uproot or snap the crop.
Mulching
Spread a 5–8 cm (2–3 inch) layer of organic mulch, such as straw, shredded leaves, or untreated grass clippings applied thinly, over the soil around Malabar spinach. Mulch helps conserve the steady moisture this leafy vine prefers and suppresses weeds that compete with young plants. Leave a small gap around the stem so damp material does not press against it. In regions with cool springs, wait until the soil has warmed before applying a thick layer: Malabar spinach grows best in warmth, and early mulch can slow soil warming. Replenish mulch as it breaks down, especially after heavy rain or weeding, but do not pile new material on top indefinitely. Check soil moisture beneath the mulch before watering, since the surface can look dry while the root zone remains damp. Use clean, seed-free material where possible to avoid introducing weeds.
Fertilizing
Before planting, mix finished compost into the soil to improve its fertility and moisture retention. Malabar spinach grows vigorously in reasonably fertile soil, so additional feeding should be moderate. If growth is slow or leaves become pale despite adequate warmth, water, and sunlight, apply a balanced fertilizer according to its label, or side-dress with finished compost during the growing season. Water after applying granular fertilizer, and keep it off leaves and stems. Container-grown plants may need more regular feeding because nutrients wash out with watering; use a dilute, balanced liquid fertilizer at the label rate and adjust to the plant’s response. Avoid excessive nitrogen, which can promote soft growth without necessarily improving the harvest, and avoid overapplying any fertilizer, which can damage roots or run off into waterways. If the soil is already rich and the vines are growing well, extra fertilizer may not be needed.
Pest Management
Inspect leaves and tender shoots regularly, including their undersides. Aphids, caterpillars, slugs, and snails may feed on Malabar spinach; problems vary by location. Hand-pick caterpillars and slugs when practical, and remove badly damaged leaves. A firm spray of water can dislodge small aphid colonies. Keep weeds down and give the vine room for air to circulate, but avoid leaving the soil so dry that growth becomes stressed. For persistent infestations, choose a product labeled for use on edible leafy crops and for the pest you have identified; follow its directions and any required preharvest interval. Insecticidal soap can help with aphids if applied thoroughly to the insects, but test a few leaves first and avoid spraying in strong sun or extreme heat. Do not treat minor cosmetic damage automatically: healthy, fast-growing vines can often outgrow it.
Harvesting
Begin picking once the vine is established and has enough foliage to keep growing. Harvest individual young leaves or snip tender shoot tips just above a leaf node; new side shoots can develop below the cut. Pick regularly for a steady supply of tender growth, leaving plenty of leaves on the plant each time. Older leaves are still edible but tend to be firmer and more mucilaginous when cooked. Harvest in the morning if convenient, when leaves are less likely to be wilted by heat. Wash the leaves and shoots before eating, and refrigerate what you will not use promptly. Malabar spinach can be eaten raw or cooked; cooking brings out its characteristic thickening texture. If you want to save seed, allow some flower spikes to develop instead of harvesting every tip. Harvest before frost, as this tropical vine is cold-sensitive.
Growing in Containers
Grows well in a pot of at least 15 litres (4.0 US gallons), with drainage holes. Can be grown indoors as a houseplant.
Propagation
From seed
- Soak seeds overnight to speed germination.
- Sow seeds about ½ inch deep after frost, when the soil is warm.
- Keep the soil evenly moist until seedlings emerge.
- Thin seedlings and provide a trellis for climbing.
From cuttings
- Cut a healthy stem 4–6 inches long just below a node.
- Remove the leaves from its lower half.
- Place the cut end in water or moist potting mix.
- Pot up the cutting once roots develop.
- Move it outdoors after frost, when conditions are warm.
Common Problems
- Yellowing leaves
- Sticky residue on leaves
- Black sooty coating
- Curled or cupped leaves
Aphids are small, soft-bodied insects that feed by piercing plants and drawing out sap. The group includes many…
- Spots on leaves
- Yellowing leaves
- Leaves dropping
Fungal leaf spot is a general name for diseases caused by many different fungi, not a single species. These fungi…
- Galls or swellings
- Stunted growth
- Yellowing leaves
- Wilting
Root-knot nematodes are microscopic roundworms that live in soil and feed inside plant roots. Several species in the…
- Brown or crispy leaf edges
- Wilting
- Bleached or scorched patches
- Leaves dropping
Frost damage is an injury caused when plant tissues become cold enough for ice to form or for cells to lose water to…
- Yellowing or slow growth: Often caused by cool weather, insufficient sun, or poor nutrition. Malabar spinach grows best in warmth.
- Root rot: Waterlogged soil can damage the roots. Use well-draining soil and avoid letting containers sit in water.
- Leaf spots: Fungal or bacterial spots are more likely when foliage stays wet. Improve airflow, water at soil level, and remove badly affected leaves.
- Pests: Aphids, leaf miners, spider mites, slugs, and snails may damage tender growth. Check leaves regularly and remove pests early.
Varieties
Its red stems and green leaves make it attractive on a trellis.
- red stems
- ornamental
- climbing
This commonly sold green-stemmed type produces tender leaves in hot weather.
- green stems
- climbing
- heat tolerant
More about varieties
- Green-stemmed Malabar spinach (Basella alba): Has green stems and leaves; commonly grown for its tender shoots.
- Red-stemmed Malabar spinach (Basella alba ‘Rubra’): Has reddish-purple stems and leaf veins; also sold under the name Basella rubra.
Health Benefits
Malabar spinach is eaten as a leafy vegetable rather than used as a proven treatment for any illness. Its leaves provide dietary fiber and nutrients, including vitamin A precursors, vitamin C, folate, and minerals such as calcium and iron. The amounts you get depend on serving size and preparation. As part of a varied diet, leafy vegetables can help people eat more fiber and meet their nutrient needs.
The leaves and tender shoots can be eaten raw when young or cooked in soups, stir-fries, and curries. Cooking softens their texture, while their natural mucilage gives soups and stews a slightly thickened consistency. Wash harvested leaves thoroughly, especially if eating them raw.
Like many leafy greens, Malabar spinach contains oxalates. People who have been advised to limit oxalates, such as some people with a history of calcium oxalate kidney stones, should ask a healthcare professional how it fits into their diet. Its iron and calcium content should not be taken to mean that the body absorbs all of those minerals equally well. Enjoy it as one of several vegetables, not as a substitute for medical care or a balanced diet.
Fun Facts
- Despite its name, Malabar spinach is not true spinach; it is a tropical climbing vine.
- It thrives in summer heat, when true spinach often struggles.
- Its slippery, mucilaginous leaves can help thicken soups and stews.
- The ripe purple berries can stain fingers and fabric.
- Given a trellis and warm weather, its vines can grow several feet long.
Notice an error or have a question about Malabar Spinach? Contact us